UEFI Enable on Panasonic Toughbooks in Windows PE

By | March 28, 2018
Share

UPDATE 04-03-2019: For newer Toughbooks you must also install SID0040 https://pc-dl.panasonic.co.jp/dl/docs/077586?dc%5B%5D=002001&lang=003&no=41&oc=001042&p1=218&p2=2180633&score=1.0&sri=13615846&trn_org=2

This setting change uses the Panasonic “WMI BIOS CONFIGURATION TOOL”: ftp://ftp.panasonic.com/computer/software/wmi_tool_software.zip

The sid0021 driver is required for this tool: http://pc-dl.panasonic.co.jp/dl/docs/076632?dc%5B%5D=002001&lang=003&no=18&oc=001039&p1=117&p2=1170603&score=1.0&sri=12295314&trn_org=2

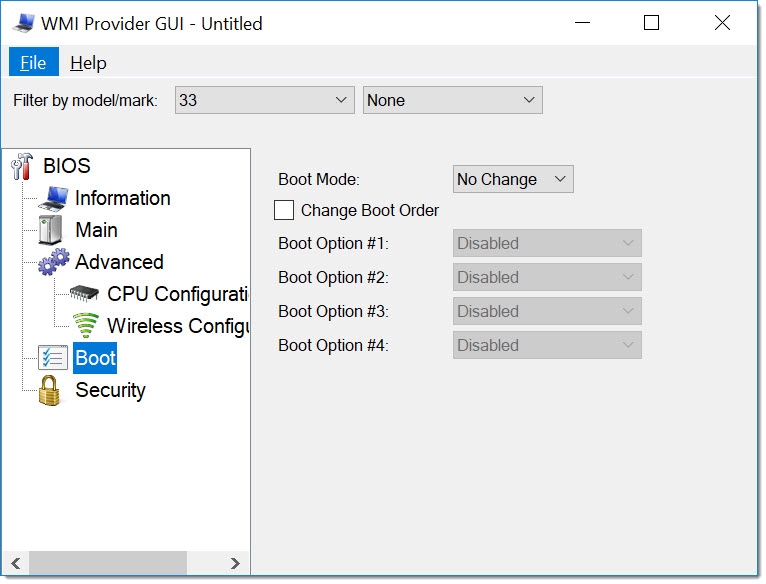
Here is a package containing both the tool, driver and batch script to enable UEFI in WinPE, but other BIOS settings can be changed using this same methodology.  Open the “ToughbookWMIGUI.exe” to view other setting changes available.

https://drive.google.com/open?id=15C7LzlfsPljvhFktgKTiRAzDiNA8WLTj

rem Copy MOF and DLL files
copy /y "%~dp0SetBIOS4Conf.dll" "%SYSTEMROOT%\system32\"
copy /y "%~dp0SetBIOS4Conf.mof" "%SYSTEMROOT%\system32\"
copy /y "%~dp0PNSNProv.dll" "%SYSTEMROOT%\system32\"
copy /y "%~dp0PNSNProv.mof" "%SYSTEMROOT%\system32\"

rem Register MOF and DLL files
mofcomp "%SYSTEMROOT%\system32\PNSNProv.mof"
mofcomp "%SYSTEMROOT%\system32\SetBIOS4Conf.mof"
regsvr32 /s "%SYSTEMROOT%\system32\PNSNProv.dll"

rem Load SID driver
drvload "%~dp0sid0021\sid0021.inf"

rem Run BIOS configuration vbs
cscript "%~dp0EnableUefi.vbs"

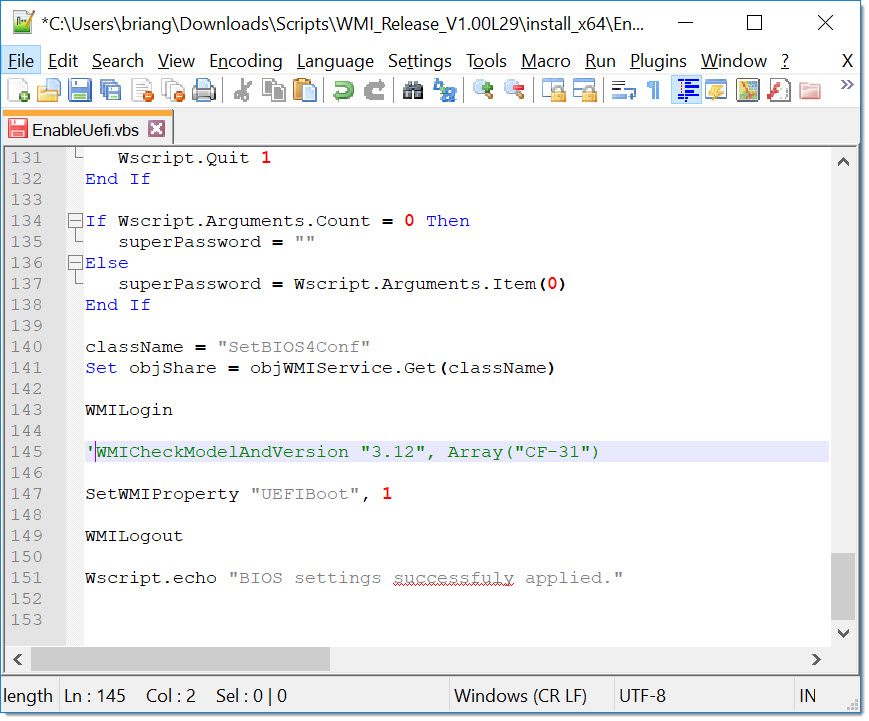
Pro tip: To skip the model check in the produced .vbs for changing BIOS settings, add a single-quote (‘) to the beginning of the model check line.

Internet Explorer start tile not working with the PowerShell Import-StartLayout

By | March 26, 2018
Share

Here is a working configuration for importing a “Internet Explorer” tile to the Start screen using the Import-StartLayout PowerShell cmdlet.  This was tested on Win 10 1703.

Here is my exported start layout.  I had to manually switch out the %APPDATA% variable with the %ALLUSERSPROFILE% to get it working.

<LayoutModificationTemplate xmlns:defaultlayout="http://schemas.microsoft.com/Start/2014/FullDefaultLayout" xmlns:start="http://schemas.microsoft.com/Start/2014/StartLayout" Version="1" xmlns="http://schemas.microsoft.com/Start/2014/LayoutModification">
  <LayoutOptions StartTileGroupCellWidth="6" />
  <DefaultLayoutOverride>
    <StartLayoutCollection>
      <defaultlayout:StartLayout GroupCellWidth="6">
        <start:Group Name="">
          <start:DesktopApplicationTile Size="2x2" Column="0" Row="0" DesktopApplicationLinkPath="%ALLUSERSPROFILE%\Microsoft\Windows\Start Menu\Programs\Accessories\Internet Explorer.lnk" />
          <start:DesktopApplicationTile Size="2x2" Column="2" Row="0" DesktopApplicationLinkPath="%ALLUSERSPROFILE%\Microsoft\Windows\Start Menu\Programs\TeamViewer 12.lnk" />
        </start:Group>
      </defaultlayout:StartLayout>
    </StartLayoutCollection>
  </DefaultLayoutOverride>
</LayoutModificationTemplate>

I also copy the “Internet Explorer.lnk” shortcut to the start menu before performing the Import-StartLayout to ensure the LNK is available.

Here is my PowerShell App Deployment Toolkit scriptlet:

Copy-File -Path "$dirFiles\Internet Explorer.lnk" -Destination "$envProgramData\Microsoft\Windows\Start Menu\Programs\Accessories\Internet Explorer.lnk"
Import-StartLayout "$dirFiles\Ts12StartLayout.xml" "$envSystemDrive\"


Clean-up Before Sysprep And Capture To Reduce The WIM File Size

By | February 21, 2018
Share

Wally Mead (DeploymentBunny) wrote a great script that accommodates his image factory.  It performs several clean up operations before running sysprep.  I run it manually on all of my Virtual Machines prior to running a Sysprep and Capture routine. I’ve seen this script reduce a WIM file by 10GB.

  1. Jump to Wally’s github and save the script you’re your MDT Deployment Share’s script folder: https://raw.githubusercontent.com/DeploymentBunny/Files/master/Tools/Action-CleanupBeforeSysprep/Action-CleanupBeforeSysprep.wsf

  2. From your Virtual Machine, map a drive to your Deployment Share and run the ZTIGather.wsf script. The purpose we run this first is to populate the OSCurrentVersion Task Sequence variable, which Wally’s script relies on.
    REM MAP Z TO DEPLOY SHARE
    net use z: \\bg\cookcounty /user:bg\mdt
    
    REM CHANGE DIRECTORY TO CONTROL FOLDER
    cd /d z:\control
    
    REM RUN ZTIGATHER TO POP OSCURRENTVERSION
    cscript.exe ..\scripts\ztigather.wsf /debug:true


    Note: I run the script from the control folder, so it can locate my “CustomSettings.ini”. This is not required, but a good in practice.

  3. Lastly, run the “Action-CleanupBeforeSysprep.wsf” and get a coffee. This script could take an hour to run depending on how defragmented the drive is.

Running a PXE Server in Windows 10 in less than 10 minutes

By | February 16, 2018
Share

UPDATE – 04-03-2019: try serva https://www.vercot.com/~serva/ instead of tftpd32, it supports uefi.

Download the “Portable” version of the Tftpd32 software.

http://tftpd32.jounin.net/

All of my source files: https://drive.google.com/open?id=1FAIPPtIogFOk_uklAS_D7YxLrxI36Hly

My TFTPROOT folder contents and source

Files were pulled from Windows 10 ADK installation.

C:\Program Files (x86)\Windows Kits\10\Assessment and Deployment Kit\Windows Preinstallation Environment\amd64\Media =>

TFTPROOT\bootmgr.exe
TFTPROOT\Boot\en-us\bootmgr.exe.mui
TFTPROOT\Boot\en-us\memtest.exe.mui
TFTPROOT\Boot\Fonts\*.*
TFTPROOT\Boot\Resources\bootres.dll
..Media\EFI\Microsoft\Boot\BCD => TFTPROOT\Boot\BCD
..Media\EFI\Microsoft\Boot\boot.sdi => TFTPROOT\Boot\bood.sdi

Opened “C:\Program Files (x86)\Windows Kits\10\Assessment and Deployment Kit\Windows Preinstallation Environment\amd64\en-us\winpe.wim” with 7-zip and copied and renamed the following file:

TFTPROOT\pxeboot.n12 => \pxeboot.0

Copied “C:\Program Files (x86)\Windows Kits\10\Assessment and Deployment Kit\Windows Preinstallation Environment\amd64\en-us\winpe.wim” and renamed to “boot.wim”

winpe.wim => TFTPROOT\sources\boot.wim

Download the latest syslixuxXX.zip from https://www.kernel.org/pub/linux/utils/boot/syslinux/

Extracted with 7zip, searched and copied out the following files to the TFTPROOT folder:

TFTPROOT\ldlinux.c32
TFTPROOT\libcom32.c32
TFTPROOT\libutil.c32
TFTPROOT\memdisk
TFTPROOT\menu.c32
TFTPROOT\pxelinux.0
TFTPROOT\vesamenu.c32

Lastly, I created a “default” file in a”pxelinux.cfg” folder with the following content:

DEFAULT vesamenu.c32
PROMPT 0
NOESCAPE 0
ALLOWOPTIONS 0
TIMEOUT 200

MENU TITLE Boot Menu
LABEL ^1 LABEL WinPE (pxeboot.0)
MENU WINPE1
KERNEL pxeboot.0

LABEL ^2 Label Windows PE (winpe.iso)
MENU WINPE2
linux memdisk
initrd winpex64.iso
APPEND iso bigraw

Dynamically assign MDT’s DeployRoot rule based on IPAddress001’s 2nd or 3rd octet.

By | May 26, 2017
Share

No DefaultGateway = No Problemo…

Oracle VirtalBox‘s built-in DHCP server does not pass a DefaultGateway to clients. This introduced a challenge when attempting to dynamically assign a “DeployRoot” in MDT’s BootStrap.ini rules file. The standard process relies on using the DefaultGateway variable (i.e. https://deploymentbunny.com/2012/04/21/back-to-basic-customsettings-ini-explained/).

To work around this limitation, I found a quick and easy way to use either the 2nd or 3rd octet of the client IP (IPAddress001) to dynamically assign the DeployRoot.

Here is my BootStrap.ini:

[Settings]

Priority=Default, SecondIpOctet, ThirdIpOctet

Properties=SecondIpOctet, ThirdIpOctet


[Default]

SkipBDDWelcome=YES

SecondIpOctet=SecondIpOctet-#Split(“%IPAddress001%”,”.”)(1)#

ThirdIpOctet=ThirdIpOctet-#Split(“%IPAddress001%”,”.”)(2)#


[ThirdIpOctet-56]

DeployRoot=\\192.168.56.1\aio

UserId=mdt

UserPassword=*******

UserDomain=bg


With this configuration, additional section breakouts can be added for either the IP’s 2nd or 3rd octet.

Here is a screenshot of the ZTIGather.wsf log output:

ð Don’t forget that a Deployment Share update is required for this change to become active.