How can I easily see how long my Deployment Tasks take?

By | October 17, 2018
Share

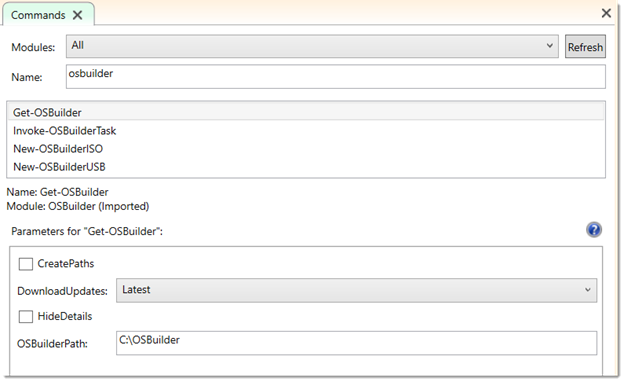
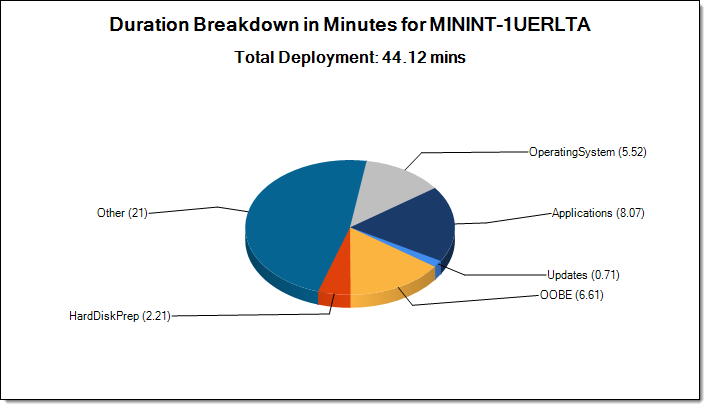
I created a powershell script that outputs a chart displaying a breakdown on Deployment task durations.

I tested it with MDT, but it should also work with SCCM.

1\Download the https://github.com/brianfgonzalez/Scripts/blob/master/ZTIDurations.ps1 script.


2\Add the .ps1 to your Deployment share’s script directory.

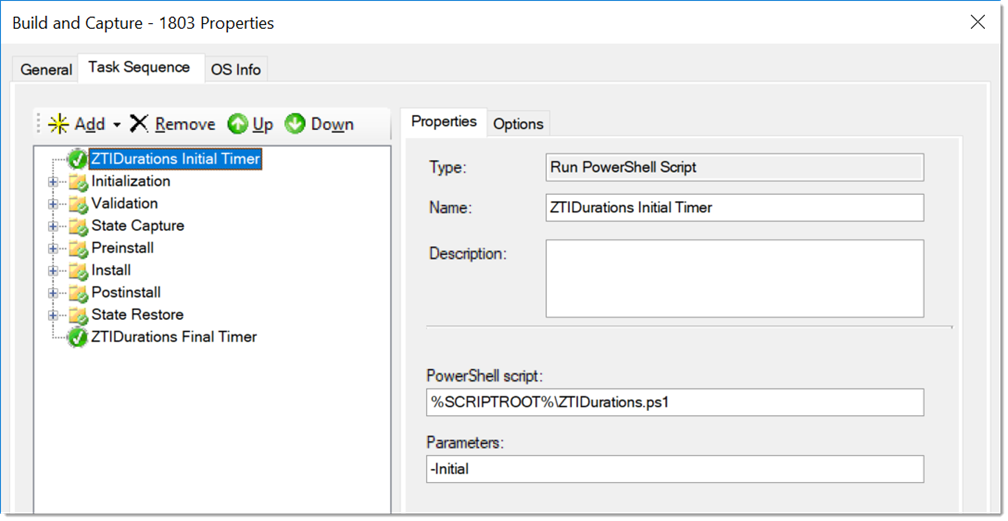
3\Add a call to the script on the top of your Task Sequence with the “-Initial” parameter.

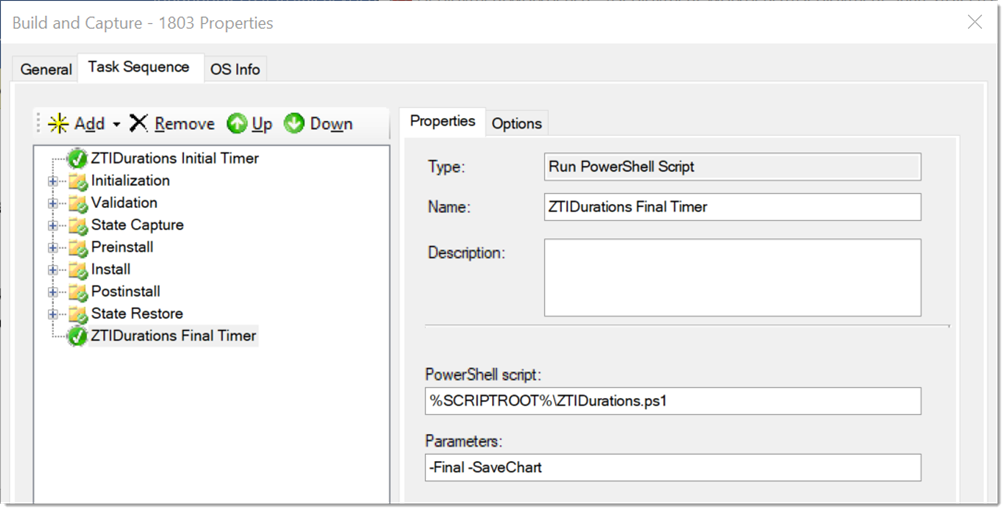
4\Add a call to the script on the bottom of your Task Sequence with the “-Final” parameter. If you want the chart, you’ll also need to pass the “-SaveChart” parameter.

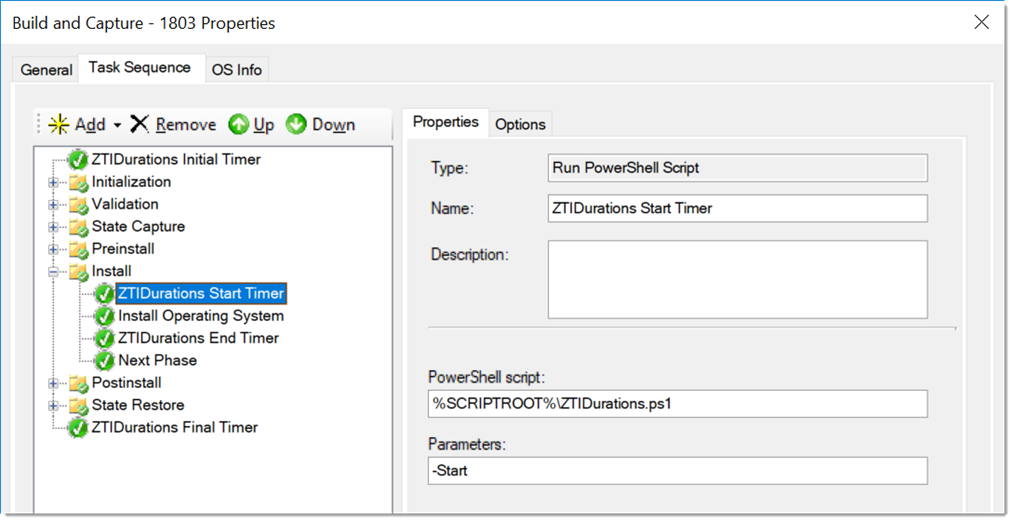
5\Add script calls throughout your Task Sequence to track your desired Deployment Tasks.

5a\For every task, add a call to the script before the task with a “-Start” parameter.

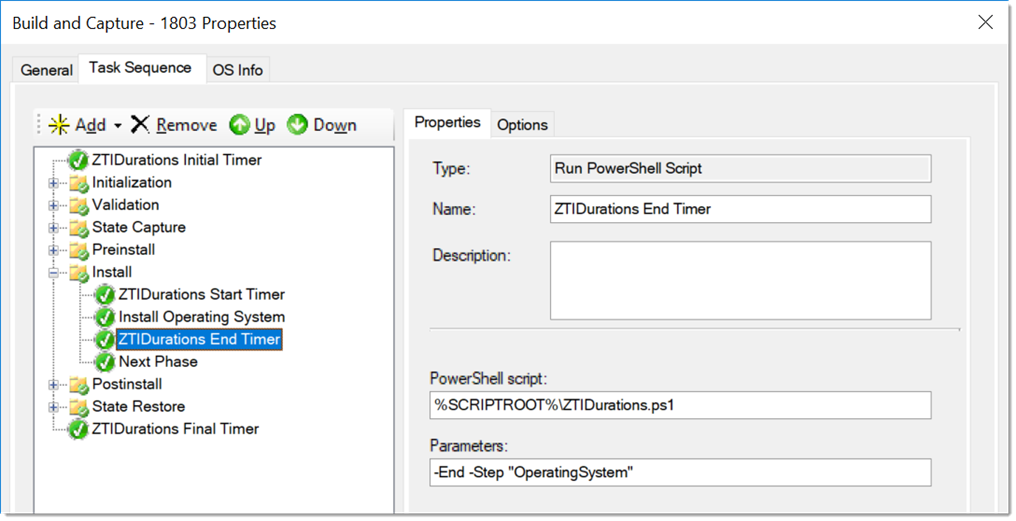
5b\and a call after the step with a “-End” parameter and a “-Step” parameter to label the task in the chart.
* Note: The “-Step” parameter doesn’t accept spaces, so use “_” if you need spacing.

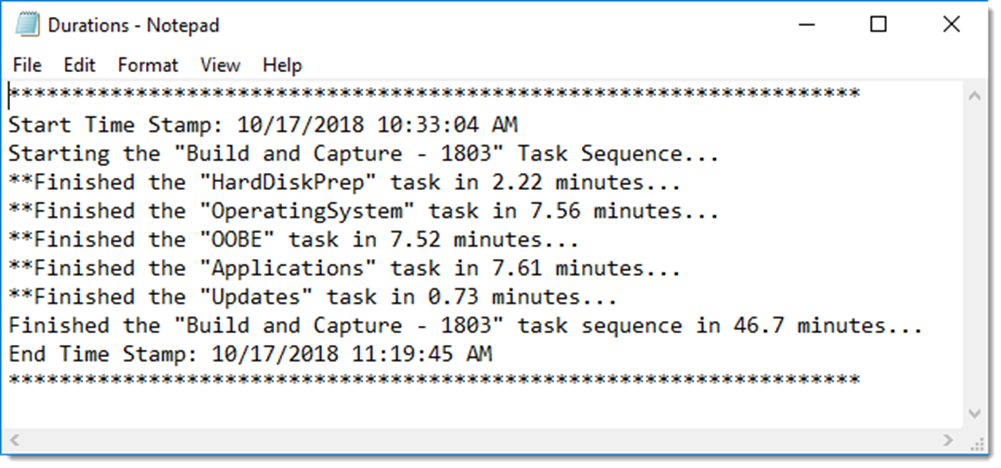
6\Perform a Deployment and review the new files in your logpath directory: Durations.json, Durations.log and Durations.png

/BG

Customize Windows 10 Installations: Part 1 – Using OSBuilder

By | September 24, 2018
Share

OSBuilder updates Windows 10 source files offline with the latest cumulative updates, installs the DotNet 3.5 feature, and strips Windows 10 built-in metro applications.

1\Install OSBuilder module via the Powershell Gallery.

https://www.powershellgallery.com/packages/OSBuilder/18.9.21.0

2\Run Get-OSBuilder to pull in the servicing stack, cumalative updates.

3\Mount a Windows 10 ISO and run Import-OSMedia. This task will pull the install.wim, winre.wim, and boot.wim files.

4\Run the New-OSBuilderTask command.

5\Run Invoke-OSBuilderTask to trigger the build.

6\Run New-OSBuilderISO to export an updated Win 10 ISO for use with MDT/SCCM.

/BG

Run a MDT Deployment Share From Media Without Creating Seperate Media Share

By | July 19, 2018
Share

Found this cool trick to run a regular MDT Deployment share from media.

  1. Add a “media.tag” file to the \Scripts directory.
  2. Format and set the flash drive as bootable.
    1. NTFS for legacy and FAT32 for UEFI (Use rufus if larger than 32gb).
  3. Create Deploy\ folder on root of Flash Drive.
  4. Copy contents of Deployment Share to Deploy\ on Flash Drive.
  5. Open Boot\Litetouch_x64.iso with 7-zip and extract contents to root of Flash Drive.
  6. Boot up laptop and perform one-time boot with Flash Drive with no Network Cable attached.
  7. It will time-out attempting to connect to the share, click on Cancel.
  8. From command prompt, open the X:\Deploy\Scripts\BootStrap.ini file and remove the rule for the DEPLOYROOT, close and save.
  9. Plug in Network, and then run “cscript x:\deploy\scripts\litetouch.wsf” to initiate the media deployment.
  10. Once the WIM is applied and it’s ready to reboot, you will have to type “exit” to close the command prompt, which will initiate a reboot to the OS.

P.S.  Here is my current Imaging Flash Drive I use:

https://www.amazon.com/gp/product/B01NARBPI7/ref=oh_aui_search_detailpage?ie=UTF8&psc=1

/BG

Windows 10 apps I remove before running Sysprep

By | June 28, 2018
Share

** Updated on 2018/07/12

Here is are the powershell commands I run prior to running sysprep on Windows 1703/1709/1803.  Without running these commands, Sysprep typically fails.


get-appxpackage *getstarted* | remove-appxpackage
get-appxpackage *photoshop* | remove-appxpackage
get-appxpackage *freshpaint* | remove-appxpackage
get-appxpackage *remotedesktop* | remove-appxpackage
get-appxpackage *skype* | remove-appxpackage
get-appxpackage *oneconnect* | remove-appxpackage
get-appxpackage *maps* | remove-appxpackage
get-appxpackage *eclipse* | remove-appxpackage
get-appxpackage *actipro* | remove-appxpackage
get-appxpackage *duolingo* | remove-appxpackage
get-appxpackage *bing* | remove-appxpackage
get-appxpackage *networkspeedtest* | remove-appxpackage
get-appxpackage *sway* | remove-appxpackage
get-appxpackage *autodesk* | remove-appxpackage
get-appxpackage *dolby* | remove-appxpackage
get-appxpackage *disney* | remove-appxpackage
get-appxpackage *candy* | remove-appxpackage
get-appxpackage *hiddencity* | remove-appxpackage
get-appxpackage *bubble* | remove-appxpackage

/BG

“Invalid signature detected. Check Secure Boot state in Setup” error

By | March 30, 2018
Share

To bypass this error, you must clear the current secure keys in the BIOS.

Enter BIOS by hitting F2 or hitting the top-left of the screen during bootup on tablets.

Go to the Security tab and enter the “Secure Boot” sub-menu.

Click on the “Clear Secure Boot keys”.

Accept the warning prompts and perform a restart. You should be able to now boot the USB media.